Installation
INSTALLATION - PREREQUISITES
| Operating System | Microsoft Windows 7 or Microsoft Windows Server 2008 |
| Database | SQL server 2008 / 2012 / 2014 |
| NET Framework | v2 or higher |
| Download | WindowsService.zip |
INITIAL SETUP
Extraction
- Download the files required by clicking the “Installation Files” button on the SQL tab of the Help web page.
- Place the “sms_integration.zip” into a chosen location. For this example, we will use the root of the C drive, but it can be anywhere.
- Extract the file by selecting it, right clicking on it and selecting “Extract Here” from the context menu. Alternatively, make use of your preferred tool for extracting the zip.
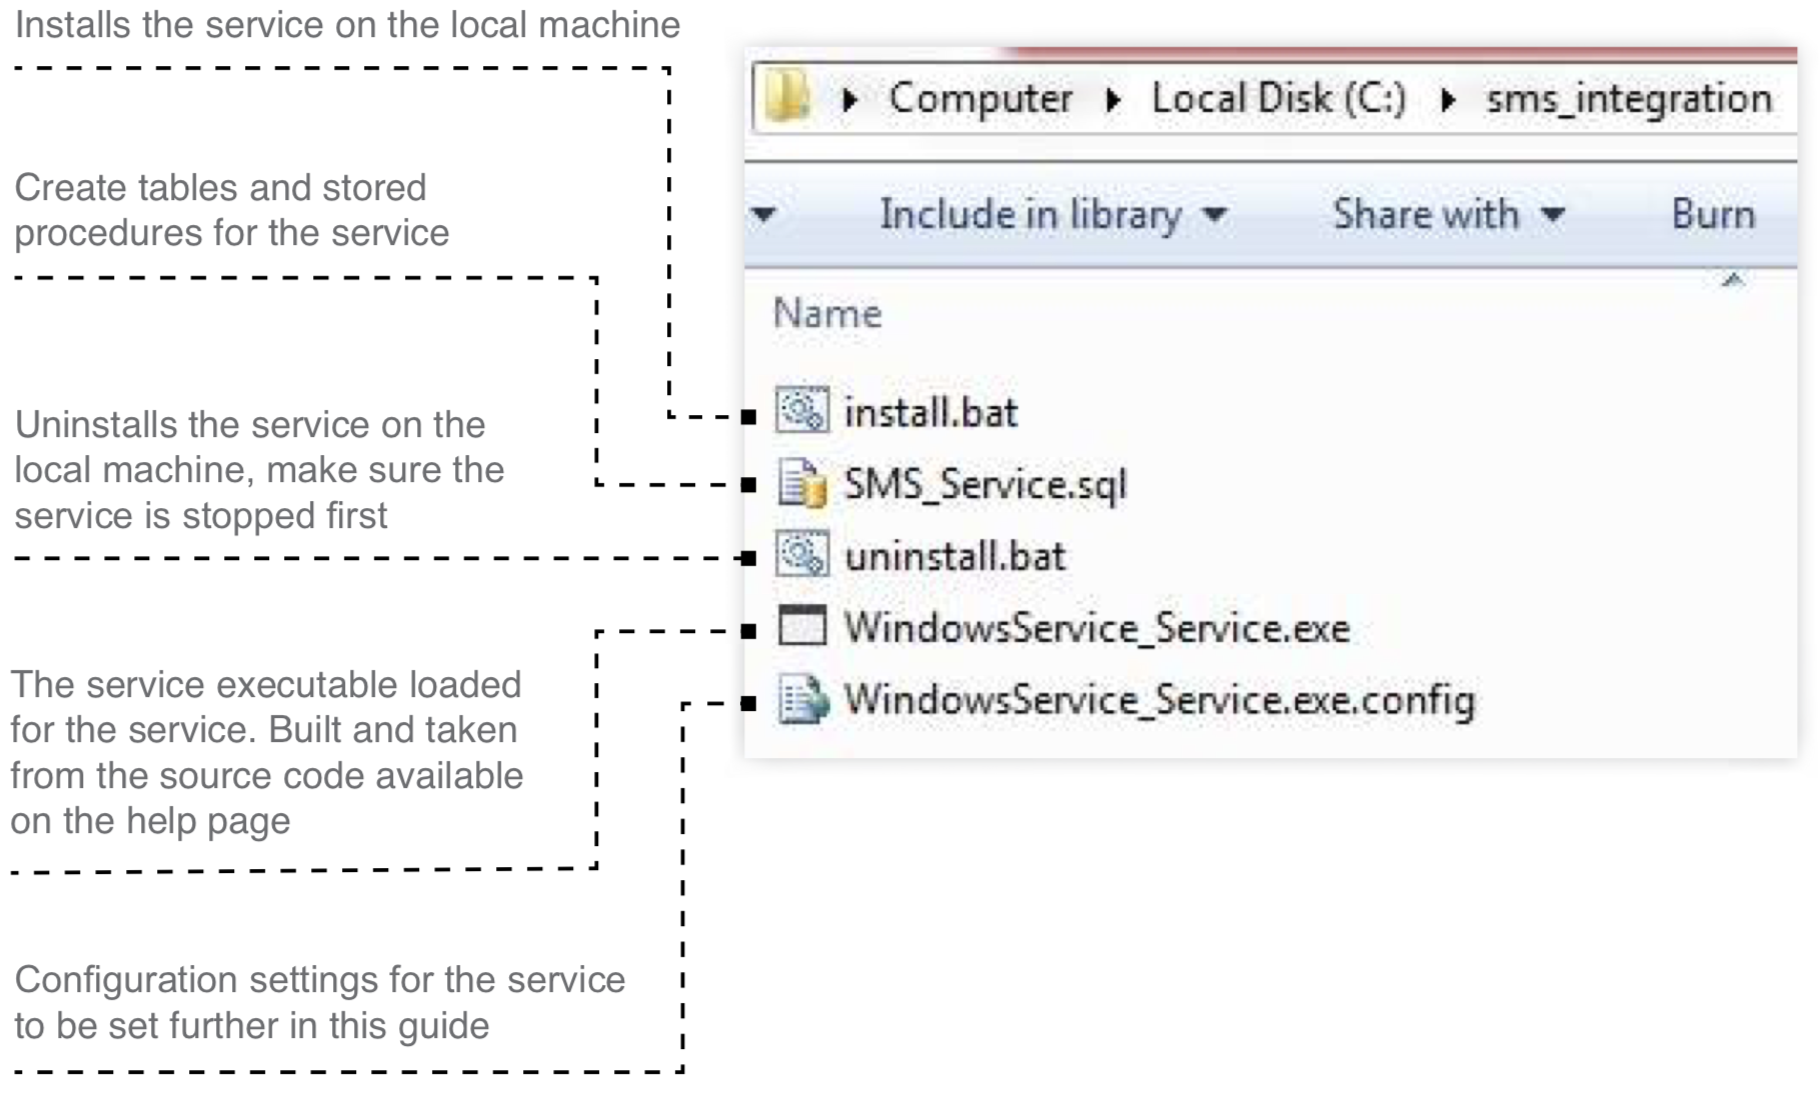
- You should now have a folder called “sms_integration”.
- A layout of the files found in the “sms_integration” folder can be found below.
Installation
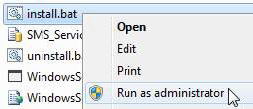
- If you are running Windows7 you may need to:
a. Select the “install.bat” file
b. Right click on the selected file
c. Select “Run as administrator”
d. If asked “Do you want to allow the following program to make changes to your computer?” click "Yes" - Otherwise just execute the “install.bat” file by double clicking it.
- You should see the following console window pop up. Press any key to close it.

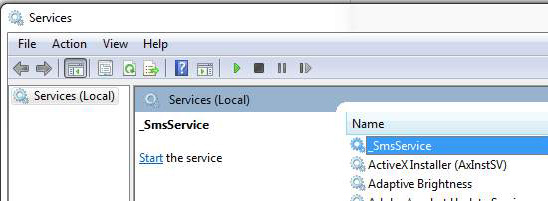
- To confirm that the installation was successful, open the Windows Services application. You can find it in the control panel, or do the following:
a. Click "Start" in the bottom left of the screen
b. Type “services.msc” into the search box
c. Type "Enter" on the keyboard
d. You should see the Windows Services application with the “_SmsService” service at the top (if the
services are ordered by name)
e. Please do not start the service yet. We l need to setup the database it reads from first.
DATABASE SETTINGS
- Create new database called ‘sms_service’ in Microsoft SQL server.
- Run SMS_Service.sql against ‘sms_service’ database using Microsoft SQL Query Analyser or Microsoft
SQL Management Studio. - The tables created by the query are discussed below.
- A number of stored procedures are created. All stored procedures can be altered to perform other operations suited to other business requirements.
| Table | Description |
|---|---|
| Queue | Insert data into Queue to have the service start sending |
| Reply | All the replies/incoming messages appear here |
| Sent | Data is moved from the QUEUE table to the SENT table once processed |
| Shortcode | All incoming messages from prime rated numbers appear here |
| Users | Table controlling the users/permissions/intervals |
CONFIGURATION SETTINGS
The following settings can be configured in the ‘C:/sms_integration/WindowsService_Service.exe.config’ file to accommodate custom database and network settings.
<appSettings>
    <add key=”ConnString” value=”packet size=4096;user id=sa;initial catalog=sms_
      service;persist security info=True;password=xxxxxxx;Data Source=.” />
    <add key=”ProxyServerIP” value=”” />
    <add key=”ProxyServerPort” value=”” />
    <add key=”ProxyServerDomain” value=”” />
    <add key=”ProxyServerUsername” value=”” />
    <add key=”ProxyServerPassword” value=”” />
</appSettings>| Setting | Description |
|---|---|
| *ConnString | This is the connection to the database. You need to set your database server username and password in this property. |
| ProxyServerIP | If you are behind a proxy server enter the IP or address of the proxy server. |
| ProxyServerPort | If you have a proxy please enter the Port. Leave empty if none. |
| ProxyServerDomain | This is not always required if you are using a proxy server. It all depends on the configuration of the server. Leave empty if none. |
| ProxyServerUsername | This is not always required if you are using a proxy server. It all depends on the configuration of the server. Leave empty if none. |
| ProxyServerPassword | This is not always required if you are using a proxy server. It all depends on the configuration of the server. Leave empty if none. |
All entries marked with * are Mandatory
WINDOWS SERVICE TEST
The Service
Ensure the Windows Service is running by opening Windows Services, as shown on the service installation above. Find the “_SmsService” and verify that the status reads “Started”. If it is not started, right click and select “Start”.
User Setup
Start Microsoft SQL Server Management Studio, create a new query on the “sms_service” database and execute the following insert statement.
Note that you have to alter “YOUR_USERNAME” and “YOUR_PASSWORD” with your account username and password, as provided by SMSPortal. This is done once per user.
To schedule an SMS to be sent by the SmsService, an insert must be made into the QUEUE table. This can be done by executing the following. Note that you have to alter the “YOUR_USERNAME” and “YOUR_PASSWORD” with YOUR ACCOUNT USERNAME AND PASSWORD AS PROVIDED BY SMSPORTAL. The mobile number needs to be preceded with the country code (omitting the first 0 of the mobile number).
INSERT INTO Users(Username, Password, GetRepliesInterval, GetDRInterval)
VALUES(‘YOUR_USERNAME’, ‘YOUR_PASSWORD’, 1, 1)
Send an SMS
Before we send an SMS please revise the following columns from the Queue table.
| Value | Description |
|---|---|
| UserId | Identifies the account to use and should match the UserId column in the Users table. |
| NumTo | The mobile number which the SMS message should be sent to. |
| Data1 | The content of the SMS message. |
To schedule an SMS to be sent by the SmsService an insert has to be done to the Queue table. This can be done by executing the following. Note you have to alter the ‘YOUR_USERNAME’ and ‘YOUR_PASSWORD’ with YOUR ACCOUNT USERNAME AND PASSWORD PROVIDED BY SMSPORTAL. The mobile number needs to be preceded with the country code and the 0 before a mobile number must be left out.
INSERT INTO Queue (UserId, Numto, Data1)
VALUES(
  (SELECT UserId FROM Users where Username = ‘YOUR_USERNAME’ and Password =
  ‘YOUR_PASSWORD’),
      27720000000,
      ‘TEST MESSAGE’
)
If the Windows Service has been installed correctly then the service should automatically process the new message and the mobile device should receive an SMS message.
Updated about 1 year ago