SQL API (Legacy)
This legacy SQL API has been replace with an updated SQL API
Deprecation Notice
- Our Legacy SQL API has been deprecated and will no longer receive updates or enhancements. It has been replaced by our REST-based SQL API, offering improved performance, and security. Please refer to the New SQL API Documentation for further details.
Important: API Channel Activation for New Accounts and Sub-AccountsWhen you create a new Account or Sub-Account, please be aware that by default, no API channels will be active. To enable API access and manage your Accounts and Sub-Accounts' API credentials and settings, please follow the steps outlined in the "API Keys" page.
Note for Accounts Created Before 6 June 2023: If you have an Account that was created before 6 June 2023, the API channels would have been automatically enabled. However, if you wish to switch to an alternative API or use additional APIs, you will need to create an API Key for the desired API.
Please note: To make use of the SQL API a Webservice API Key needs to be generated.
Overview
The Windows service is a two-part application, consisting of the following parts:
- Windows service (written in Microsoft .Net 2)
- SQL Server database
In order to utilise the service, Microsoft .Net 2 runtime and Microsoft SQL server (MS SQL) must be installed. The service simplifies the transport layer between an application (local environment) and the SMS gateway. The user can simply write data to a QUEUE table and have the service take care of the communication layer. It also caters for all updates of delivery receipts / replies.
The service was written for multi-user accounts. Each user account can have a different properties set that includes:
- Active (if false it won’t send for that specific user)
- Start and End hour (only send between the following hours)
- Poll interval on the Queue (the more aggressive the more the machine will work)
- Interval to fetch receipts and replies (the more aggressive the more bandwidth is consumed)
The service allows the following when sending:
- Queue messages into the future
- Assign priority to each message (the higher the priority the faster the service will process it)
- Send SMS messages only
Architecture
The Windows service was designed using a multi-threaded object orientated architecture, to simplify any future additions and to allow clients to customise the service to their specific requirements.
The threads work seamlessly together to create a non-blocking environment, to improve performance and message throughput. However, the throughput is ultimately determined by the speed of the Internet connection being utilised.
Configuration
The config file accompanying the service caters for specific database and network connection settings. This includes the connection string to the database (which can be on a different server) and the connection settings for your Internet connection. This is only relevant if a firewall / proxy server is being utilised in your environment.
All settings are controlled via the database and sending of data can be paused for a user mid-stream. The paused messages can then be removed from the queue or delayed for a future date.
INSTALLATION - PREREQUISITES
| Operating System | Microsoft Windows 7 or Microsoft Windows Server 2008 |
| Database | SQL server 2008 / 2012 / 2014 |
| NET Framework | v2 or higher |
| Download | WindowsService.zip |
CREATE YOUR API KEY
Before getting started with your initial setup, you first need to create your API Key. This can be done by logging in to your account via our website, and clicking on the "Settings" section to the left-hand side of your menu. You can then select the "API Keys" option and click on the "Create API Key" button to the top-right of your screen.
Select the "Web Service" option from the drop-down menu and continue to create your API Key. You have the option of choosing your own credentials, or auto-generating your credentials by making the specific selection.
Please note that once you close the modal showing your API Secret Key, you will not be able to see it again without generating a new one. Please store it somewhere safe.
INITIAL SETUP
Extraction
- Download the files required by clicking the “Installation Files” button on the SQL tab of the Help web page.
- Place the “sms_integration.zip” into a chosen location. For this example, we will use the root of the C drive, but it can be anywhere.
- Extract the file by selecting it, right clicking on it and selecting “Extract Here” from the context menu. Alternatively, make use of your preferred tool for extracting the zip.
- You should now have a folder called “sms_integration”.
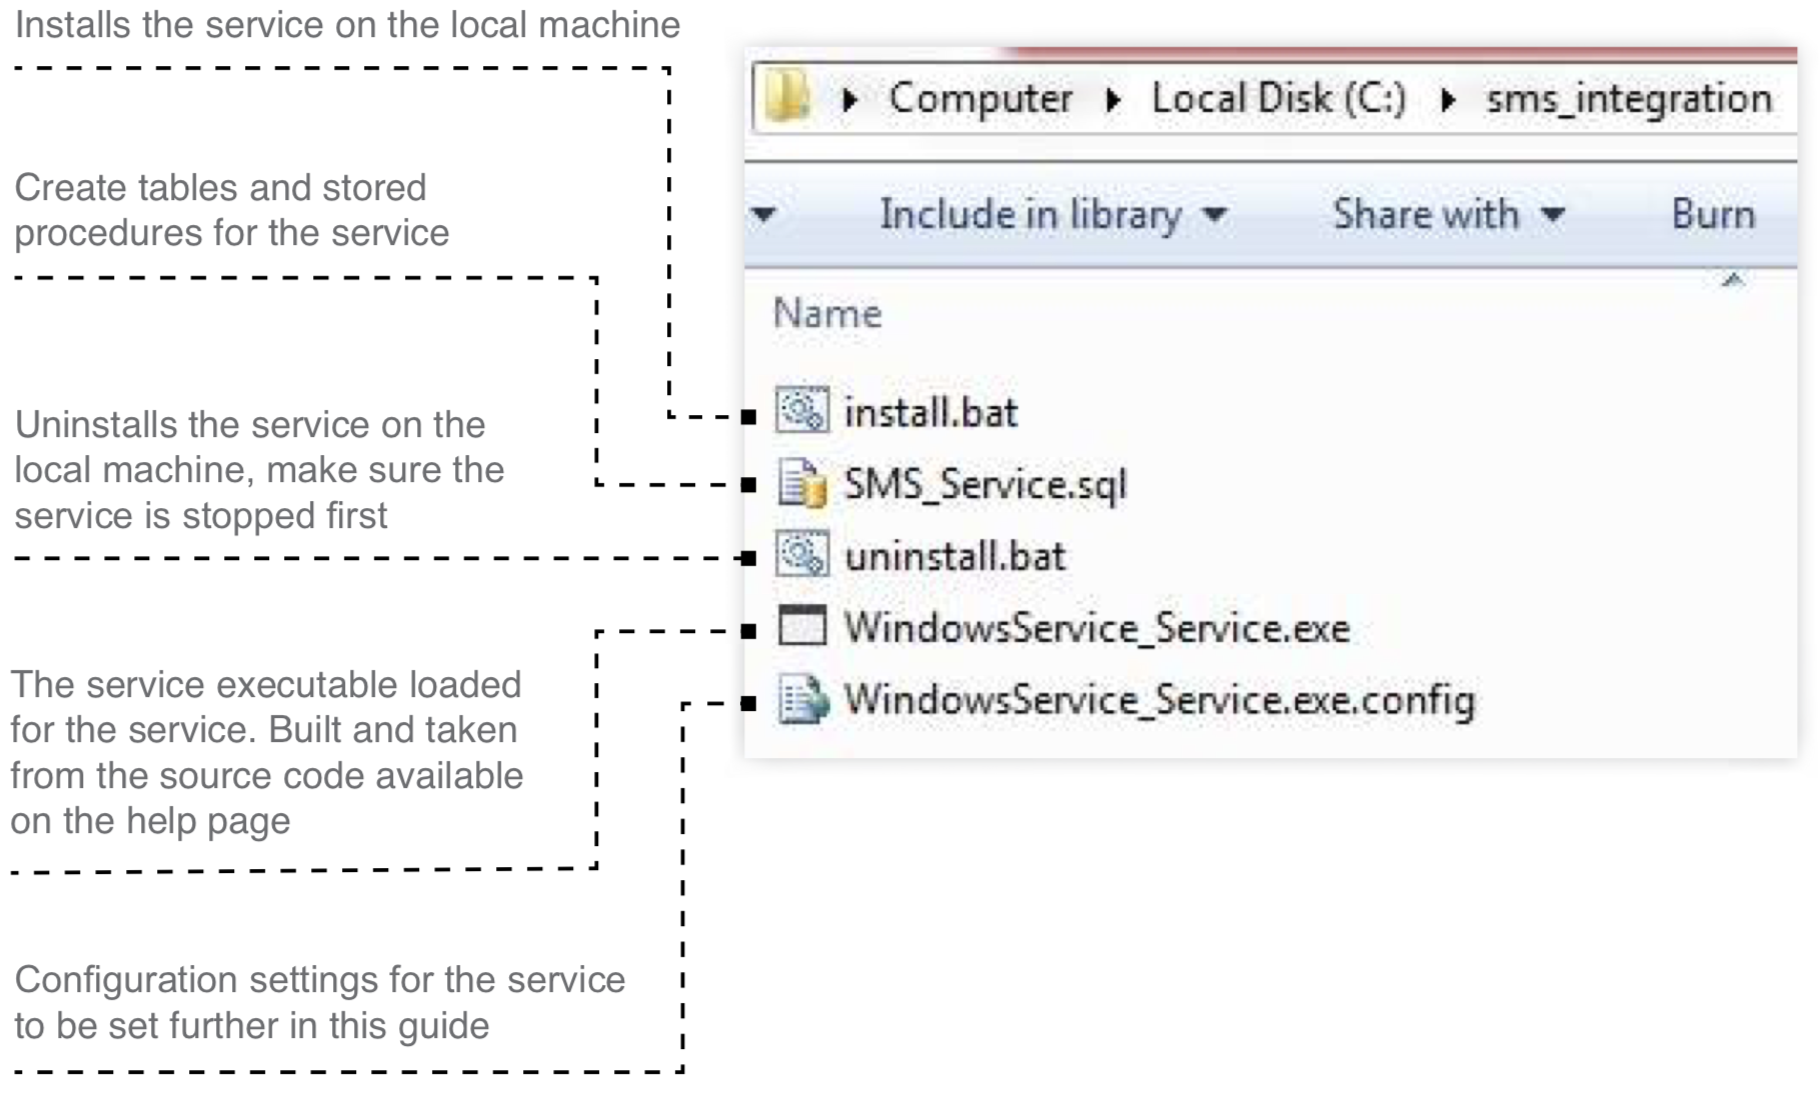
- A layout of the files found in the “sms_integration” folder can be found below.
Installation
- If you are running Windows7 you may need to:
a. Select the “install.bat” file
b. Right click on the selected file
c. Select “Run as administrator”
d. If asked “Do you want to allow the following program to make changes to your computer?” click "Yes" - Otherwise just execute the “install.bat” file by double clicking it.
- You should see the following console window pop up. Press any key to close it.

- To confirm that the installation was successful, open the Windows Services application. You can find it in the control panel, or do the following:
a. Click "Start" in the bottom left of the screen
b. Type “services.msc” into the search box
c. Type "Enter" on the keyboard
d. You should see the Windows Services application with the “_SmsService” service at the top (if the
services are ordered by name)
e. Please do not start the service yet. We l need to setup the database it reads from first.
DATABASE SETTINGS
- Create new database called ‘sms_service’ in Microsoft SQL server.
- Run SMS_Service.sql against ‘sms_service’ database using Microsoft SQL Query Analyser or Microsoft
SQL Management Studio. - The tables created by the query are discussed below.
- A number of stored procedures are created. All stored procedures can be altered to perform other operations suited to other business requirements.
| Table | Description |
|---|---|
| Queue | Insert data into Queue to have the service start sending |
| Reply | All the replies/incoming messages appear here |
| Sent | Data is moved from the QUEUE table to the SENT table once processed |
| Shortcode | All incoming messages from prime rated numbers appear here |
| Users | Table controlling the users/permissions/intervals |
CONFIGURATION SETTINGS
The following settings can be configured in the ‘C:/sms_integration/WindowsService_Service.exe.config’ file to accommodate custom database and network settings.
<appSettings>
    <add key=”ConnString” value=”packet size=4096;user id=sa;initial catalog=sms_
      service;persist security info=True;password=xxxxxxx;Data Source=.” />
    <add key=”ProxyServerIP” value=”” />
    <add key=”ProxyServerPort” value=”” />
    <add key=”ProxyServerDomain” value=”” />
    <add key=”ProxyServerUsername” value=”” />
    <add key=”ProxyServerPassword” value=”” />
</appSettings>| Setting | Description |
|---|---|
*ConnString |
This is the connection to the database. You need to set your database server username and password in this property. |
ProxyServerIP |
If you are behind a proxy server enter the IP or address of the proxy server. |
ProxyServerPort |
If you have a proxy please enter the Port. Leave empty if none. |
ProxyServerDomain |
This is not always required if you are using a proxy server. It all depends on the |
ProxyServerUsername |
This is not always required if you are using a proxy server. It all depends on the |
ProxyServerPassword |
This is not always required if you are using a proxy server. It all depends on the |
All entries marked with * are Mandatory
WINDOWS SERVICE TEST
The Service
Ensure the Windows Service is running by opening Windows Services, as shown on the service installation above. Find the “_SmsService” and verify that the status reads “Started”. If it is not started, right click and select “Start”.
User Setup
Start Microsoft SQL Server Management Studio, create a new query on the “sms_service” database and execute the following insert statement.
Note that you have to alter “YOUR_USERNAME” and “YOUR_PASSWORD” with your account username and password, as provided by SMSPortal. This is done once per user.
To schedule an SMS to be sent by the SmsService, an insert must be made into the QUEUE table. This can be done by executing the following. Note that you have to alter the “YOUR_USERNAME” and “YOUR_PASSWORD” with YOUR ACCOUNT USERNAME AND PASSWORD AS PROVIDED BY SMSPORTAL. The mobile number needs to be preceded with the country code (omitting the first 0 of the mobile number).
INSERT INTO Users(Username, Password, GetRepliesInterval, GetDRInterval)
VALUES(‘YOUR_USERNAME’, ‘YOUR_PASSWORD’, 1, 1)
Send an SMS
Before we send an SMS please revise the following columns from the Queue table.
| Value | Description |
|---|---|
| UserId | Identifies the account to use and should match the UserId column in the Users table. |
| NumTo | The mobile number which the SMS message should be sent to. |
| Data1 | The content of the SMS message. |
To schedule an SMS to be sent by the SmsService an insert has to be done to the Queue table. This can be done by executing the following. Note you have to alter the ‘YOUR_USERNAME’ and ‘YOUR_PASSWORD’ with YOUR ACCOUNT USERNAME AND PASSWORD PROVIDED BY SMSPORTAL. The mobile number needs to be preceded with the country code and the 0 before a mobile number must be left out.
INSERT INTO Queue (UserId, Numto, Data1)
VALUES(
  (SELECT UserId FROM Users where Username = ‘YOUR_USERNAME’ and Password =
  ‘YOUR_PASSWORD’),
      27720000000,
      ‘TEST MESSAGE’
)
If the Windows Service has been installed correctly then the service should automatically process the new message and the mobile device should receive an SMS message.
USAGE - Assumptions
The Windows Service and Database have been installed.
Database Structure
The following explains the database and its tables and stored procedures, installed as part of the Windows Service installation instructions.

User Table
| Column | Description |
|---|---|
| UserID | Auto number. The user needs to exist on the SMS Gateway. |
| Username | The Username of the user on the SMS Gateway |
| Password | The Password of the user on the SMS Gateway |
| Credits | The number of SMSes remaining on the account |
| Active | If set to False the service will not monitor the account for any changes or send your messages |
| SendStartHour | This depicts when the service should start monitoring this account to send. If set to 5 then any time after 5:00 will be included. |
| SendEndHour | This depicts when the service should stop monitoring this account to send. If set to 17 then any time before 17:59 will be included. |
| GetRepliesInterval | Value in minutes. How often the system will check the gateway for new replies. If set to “0” it won’t perform this operation. |
| GetDRInterval | Value in minutes. How often the system will check the gateway for new DRs (Delivery Receipts). If set to “0” it won’t perform this operation. |
| GetSCInterval | Value in minutes. How often the system will check the gateway for new incoming shortcode (premium number) entries. If set to “0” it won’t perform this operation. |
| ProcessQueueInterval | Value in seconds. How often the system will check the QUEUE table for new data to send for UserID X. If set to “0” it won’t perform this operation. |
| MaxRepliesID | Internal value – do not touch |
| MaxDRID | Internal value – do not touch |
| MaxSCID | Internal value – do not touch |
| LastProcessReplies | A date depicting when last the service checked for replies. Internal value – do not touch |
| LastProcessDR | A date depicting when last the service checked for DRs. Internal value – do not touch. |
| LastProcessSC | A date depicting when last the service checked for shortcodes. Internal value – do not touch. |
| LastProcessQueue | A date depicting when last the service checked for data to send. Internal value – do not touch. |
Post Paid CustomersCredits will always return a value of 1000000 on Post Paid accounts as no credit deduction occurs on this account type.
Queue Table
This table defines when and what should be sent.
| Column | Description |
|---|---|
ID |
Auto number. Used by the service. |
UserID |
Used by the service to determine if the data needs to be sent based on the rules for this user. |
Type |
“SMS”. |
SenderID |
This is where the SMS will originate from. This may or may not be allowed depending on the settings on the SMS Gateway, country/network restrictions, etc. Default = “Repliable” |
NumTo |
Where the SMS will be sent. |
Data1 |
Message Text |
SendDatetime |
This is the time you want the message to be sent. The message is only sent to the SMS |
Priority |
The higher the priority the quicker the service will process this message. |
Retrycount |
Internal value. Starts at “-1”. If it has failed after 3 attempts it gets removed and inserted into the SENT table with status “RETRYCOUNT EXCEEDED”. |
CostCentre |
This can be used to do reporting on which business units sent messages |
CustomerID |
This value is purely for integration with your software. You can write data to the field, |
The following fields must be populated for data to be sent successfully
- a. UserID
- b. Numto
- c. Data1
Sent Table
The SENT table contains the exact same structure as the QUEUE table, with the following exceptions:
| Column | Description |
|---|---|
| SubmittedDatetime | When the SMS was submitted to the SMS Gateway |
| StatusDatetime | When the status was altered from the SMS Gateway |
| Status | The status of the message. For successfully submitted messages this can be “DELIVRD”, “UNDELIV”, ”EXPIRED”, ”UNKNOWN” |
Reply Table
This table contains all the incoming messages.
| Column | Description |
|---|---|
ReplyID |
Determined by the SMS Gateway. Internal use. |
ID |
The corresponding ID in the SENT table (matches to an outgoing message). |
UserID |
The user that sent the message. |
ReceivedData |
The incoming data. |
ReceivedDatetime |
When the reply was received. |
OptOut * |
If the message contains keywords indicating that the client wishes to opt-out then this |
CustomerID * |
A user defined value that can be used for matching. Any status updates or replies |
Fields can only be used in the most recent version of the Windows Service. Please contact support for more information
Shortcode Table
This table contains all the incoming messages from shortcodes (premium numbers).
| Column | Description |
|---|---|
| ID | Determined by the SMS Gateway. Internal use. |
| UserID | The user that sent the message. |
| Shortcode | The shortcode number, e.g: 31234. |
| Keyword | If the short code operates from a keyword then it will be displayed, otherwise blank. |
| NumFrom | The number the message originated from. |
| Data | The incoming data. |
| Received | When the reply was received. |
Example 1
Careful configuration of the USERS table will let the service control how messages are being sent. The example below shows such a situation.
Two user accounts with the same Username can be inserted into the USERS tables, resulting in Userid 1 and 2 . The Userid record can be configured so that Userid 1 is restricted to sending between 8:00 and 17:59, and Userid 2 from 0:00 to 23:59. This allows, for example, to write important messages to Userid 2, which will be sent at any time of the day, and bulk messages to Userid 1, restricting them to business hours only.
Due to the architecture of the system, new columns can be added to any table for customisation. This will allow the storage of more data against each outgoing message and is useful for specific business requirements. When making these customisations, ensure that the stored procedures that refer to these tables are also updated so that data from the QUEUE will be added to the SENT tables, etc.
Example 2
The system monitors the QUEUE table based on the USERS table.
The system collects the data from the QUEUE table and, once submitted to the gateway, removes it and inserts the data into the SENT table.
The status in the SENT table will be “SUBMITTED”. If there was an issue with the data it will still submit it, remove it from the QUEUE and insert into the SENT table. The status could vary from “data1 invalid” to “number invalid” depending on whether the data was correct.
ERROR LOGGING
The Windows Service creates a folder in the “C:\windows\system32\logging” for logging errors. Each “part” of the service creates a file which is time stamped to the hour.
Issue 1 - Not sending
- Is there a record in the USERS table?
a. Is the “Active” field = 1 (true)?
b. Is the current time (hour) greater than the SendStartHour and less than or equal to SendEndHour?
c. Is the ProcessQueueInterval greater than 0 (field is based on seconds to poll the QUEUE table)?
d. Is the LastProcessQueue field changing its time? - Is there data in the QUEUE table?
- Check the logging folder
The sending process selects from the QUEUE table, then increases the RetryCount field in the QUEUE table by 1 to show an attempt.
On success, the item is:
- First deleted from the SENT table (precautionary measure, 0 rows should be affected)
- Inserted into the SENT table from the QUEUE table, with status “SUBMITTED”
- Deleted from the QUEUE table
On failure the item is:
- First deleted from the SENT table (precautionary measure, 0 rows should be affected)
- Inserted into the SENT table from the QUEUE table with a status description (“NUM invalid”)
- Deleted from the QUEUE table. If the item is attempted 3 times it will be moved by a background thread, with status “RETRY EXCEEDED”.
Issue 2 - Not receiving status updates or replies:
- If there is a record in the USERS table?
a. Is the GetDRInterval positive (value is minute based)?
b. Is the GetRepliesInterval positive (value is minute based)?
c. Are the LastProcessReplies and LastProcessDR timestamps changing?
Updated 11 months ago